|
|
Post by oldmoleskins on Mar 30, 2007 17:13:33 GMT
Posting to the veg lexicon the other day, confessing my failure with beetroot and then RF's spud problem, coupled with the upcoming 'trials' and 'competition' has suggested this idea to us: would the more experienced growers among us be prepared to share their top growing tips on fruit and veg?
I'm sure there are members - including me - that would like to extend (or start) a range of fruit and veg - so, why not post below on the commonly shop-bought ones we could provide for ourselves this year?
We're not aiming for an A-Z, but a little brochure of good tips to get more pleasure from your patch - and a good harvest.
With his permission, I'll start by reposting DavidK's thread on leeks, and then it's over to you!
OM.
ps - to keep it simple to refer to, perhaps it would be a good idea start a new thread if anything you see here raises a query rather than post to this one...
|
|
|
|
Post by oldmoleskins on Mar 30, 2007 17:14:50 GMT
David K's Growing Leeks
Hi all!
A little while ago someone mentioned growing leeks, so for what it's worth this is my take on it.
Any time now I sow my leek seed in a seed bed in the open ground.
By mid summer when the plants are about as thick as a pencil and 20 cm (8 in) high, they will be ready for transplanting to their permanent position.
If you are able to plant during showery weather the young plants will settle more quickly, otherwise water the bed the day before if the soil is dry.
To plant leeks in holes, *use a thick dibber or trowel and make the holes 15 cm (6 in) deep and 15-23 cm (6-9 in) apart, depending on what size of leek you want.
Make sure the holes are vertical and move the dibber about from side to side so that they are slightly larger at the top.
The holes should be about 5 cm (2 in) in diameter. Cut back the roots until they are 2.5 cm (1 in) long and trim the tips of the leaves back slightly.
Lower the young leeks gently into the holes and fill the holes with water.
The water will wash enough soil over the base of the plant to allow it to become established.
As you hoe the ground from time to time the holes will gradually fill up with soil.
*I’ve found a really useful dibber can be a handle such as those found on a lawn edging tool, these can be bought for a couple of pounds & will last for years.
*Oh! And they come ready pointed.
|
|
|
|
Post by davidk on Mar 30, 2007 22:15:45 GMT
Hi!
For anyone who may be interested and for OM in particular, this is my take on growing beetroot.
Beetroot likes sandy soil that's rich in organic matter, with a pH of 6.5 to 7.0 (6.5 is ideal). Beetroot doesn't like acidic soil. add lime if required
Beetroot should be sown when the danger of hard frost has passed mid-April is about right.
Make a succession of sowings in order to avoid a glut, plant in small batches up until mid-July.
Before sowing, soak the seeds in water for an hour or so. This will remove any chemicals present applied by the seed company to stop them sprouting whilst in store.
Only soak enough seeds necessary for immediate planting.
Take out a drill about 2.5cm (1in) deep - where more than one row is to be planted, space each row about 30cm (1ft) apart. Space the seeds in the drill 5cm (2in) apart and cover with soil.
Water if the soil is dry.
Unless the soil is light and sandy, cover the seed with compost (multi-purpose will do) instead of the soil taken out of the drill; this will help the seedlings break through a compacted surface.
[Here it may be worth noting that each seed-case actually contains about 3 or 4 seeds, therefore it’s advantageous to just plant 2 or 3 seeds at 2 inch intervals, this will be both more economical with seed and will save a lot of work later when thinning out]
The seedlings will appear in about 15 days, depending on the weather.
Each seed planted will result in a cluster of three or four seedlings.
Remove the weakest seedlings, leaving only the strongest for each seed sown.
When the seedlings reach 5cm (2in) high, thin them to their final distance apart. This is 10cm (4in) apart for round or globe varieties and 15cm (6in) apart for long varieties.
Personally, I can recommend the variety ‘Bolthardy’ it does just what it says on the tin. i.e. is resistant to bolting.
Good luck.
|
|
|
|
Post by Deleted on Mar 30, 2007 23:04:03 GMT
DK - I have grown Bolthardy with never any problems. Have you grown any of the white/no bleed varieties?
|
|
|
|
Post by davidk on Apr 1, 2007 8:58:42 GMT
As a footnote to my first message re beetroot I would just like to add:
Whilst speaking to a gardening friend recently, he informs me that after years of spasmodic results with growing beetroot, he now uses those 'soakable coir disc modules'.
By sowing a single seed into each module and removing the weakest seeding, then transplanting into the open ground, he now has no problem and achieves almost 100% success.
I would say that in view of the cost involved, I probably wouldn't try this method myself.
|
|
|
|
Post by Chuckles on Apr 2, 2007 18:50:15 GMT
This is a wonderful thread and I'm a complete novice at this veggie growing  I have my first sowing of carrots poking through in one of my raised beds and some tips I've picked up on the way to help with the dreaded carrot fly are to plant Chives between the rows, also I was told to put a thin layer of fresh grass cuttings on the surface to prevent them too. |
|
|
|
Post by davidk on Apr 2, 2007 20:17:54 GMT
Growing Spring Cabbage
In my opinion this is one of the most delicious & rewarding to grow of all the brassica family.
Usually planted out after an early crop like potatoes or peas, and in which case no special preparation of the ground is needed.
Seeds should be sown during July.
The ground should be raked down finely, the drills made ½ inch deep and 9 inches apart.
Thin sowing is preferable; the plants should be put out into their permanent positions in September. In the south, August sowing can be made for October planting.
Plant 12 inches between plants and 18 inches between rows.
On heavy soil nitro-chalk can be used in March to hurry them along, but on other soils nitrate of potash will be more suitable.
|
|
|
|
Post by oldmoleskins on Apr 3, 2007 8:27:45 GMT
OldMoley's way with Runners is that more or less anything goes - and you have plenty of time to start...
First, the seed: choose any variety you like the sound of, it's as simple as that, though flower colour might be an issue - basically you have a choice between red and white.
You will need two seeds per 15 inches of ground you're going to use and a few for spares. - as guide, 2 dozen plants will provide ample for a small household. Sow in April under glass for planting out as soon as frost danger is past (and don't forget to 'harden off' for a week before you plant - ie acclimatise by putting them outside during the day) or sow in situ as soon as frost danger is past - probably end April/ May.
Inside, you can sow into anything you like - I have a preference for peat pots, to avoid root disturbance, though for years gardeners have been sowing into trays and tearing the plants out with no apparent harm... if you have some old 3inch pots they would be ideal.
While the seeds are germinating and growing for you, prepare the site. Dig out the chosen area well. Ideally you would have done this earlier, but again it's not too late. Instead of using stuff to enrich and improve moisture holding that would rot down over winter, you just need to incorporate readymade compost instead. So - a shallow trench and tip in the contents of a cheap growbag (or your own wonderful mix) and stir about a bit.
You need to provide something for them to climb up - about 6 feet high. Canes are ideal - in a row leaning against a wall, freestanding as an 'wigwam', or a double row leaning in to each other. Some 'cross canes' are good, for extra stability and twining space.
You can have a single upright row if you want - but it must be securely anchored - there will be a lot of wind-resistance when the plants are fully grown, and you will not have the support of the 'leaning together' types, so be careful...
Whatever cane structure you use, be sure to allow for some to be pushed well into the ground, so buy over-long.
You can of course grow them up anything else - old rose arches, dead trees, drainpipes, netting, a ladder... whatever it is, just remember they are twiners so may need help with a cane or two on anything big - like a tree trunk.
So, form your supports, (say 15 inches apart) plant two seedlings per support, keep well watered, help them get started by gently tying them to the support if they seem lost, and pinch them out when they reach the top and start to wave about. Oh, and give your spares to a neighbour.
6 weeks later... pick beans when smaller than shop-bought, they will be better. Pick every other day as they reach your chosen size to kid the plants into continuing the flowering process and extending your cropping. Every day if you like.
I promise, your own Runners are nothing like shop-bought - the 'industry' lets them go on too long (to get more weight to sell) and they lose condition after picking. They will be delicious, they provide a decorative and sometimes useful screen, and they're easy.... go on, give 'em a go!
OM.
ps... everything above applies to the climbing French beans in the 'trials' too, so if you really don't like runners...
|
|
|
|
Post by Deleted on Apr 3, 2007 17:25:56 GMT
Gardenhammerette's way with Tomatoes......... There is nothing nicer than a tomato you have grown yourself, picked fresh from the plant while it's still warm from the sun and popped straight in your mouth!! Tomatoes were the first thing I grew when I got my greenhouse and IMO they are worth the effort (and you do need to give them abit of daily attention) First, the seed - so many different varieties to select - cherry are great in salads, beefsteak are good for stuffing, plum types usually make excellent tomato sauces and then there's the 'ordinary' ones which are probably what you'd find in most supermarkets. It is worth doing abit of a search into the different types - then you can grow something that will really suit your needs. If you haven't got any seed you can buy a small plant from most GC's, although these will more likely be ordinary varieties - still worth a go though!! Tomatoes fall into 2 category's - CORDON (or INDETERMINATE) and BUSH. The difference being that a CORDON plant will grow and grow and grow (taller). You will have to stop it growing by pinching out the top, and it will need some support (bamboo cane). Back to seed....you can sow as early as January in a heated greenhouse (50 degrees F), in an unheated greenhouse end of Feb/beginning of March. Seeds should germinate within 7-10 days, when they have formed a pair of true leaves (they have jagged leaves) they can be pricked out into a 3" pot and grown on. When the plants reach 6-8" tall they can be planted into their final position - ie 2 plants in a grow-bag or 1 plant into a very large pot (I use plastic plant pots,the sort that florists display bouquets in), they can also be planted into soil (ie in the garden border). They should be read for planting out into the greenhouse end of April/beginning of May. If you are planting outside be sure all likelihood of frost has passed. You will need to give the plant some support once it starts reaching a reasonable height (bamboo cane) and you will need to pinch out side-shoots of CORDON varieties - these grow out from between the main stem and the leaf stalks, nip them out when they are about 1" long. Tomatoes need regular watering ( irregular watering may lead to blossom end rot or split fruit), if you are using grow-bags they will need to be kept moist at all times. They also benefit from feeding with a Tomato fertilizer once the first truss has set fruit. Feed once or twice a week during the growing season. MY TIP is to sink a small plant pot into the soil nest to the tomato plant and water via this - then way you are helping water reach the roots  . As already mentioned Tomatoes will grow in a grow bag. I personally prefer to grow 1 plant in a pot. Good layer of crocks in the bottom and then fill it up with compost ( I mix multi purpose with abit of my own made stuff and some manure - tomatoes are hungry things!!) You should be picking Tomatoes about July - depending on if you have them in a greenhouse or outside, what the weather is like, and where you live in the country. OM - Do let me know if I've missed anything vitally important off!! I feel as if I've 'rambled on' a bit!! +++++++++++ After the very good post from GH on growing tomatoes, there really isn’t a great deal more to be said, although I have seen a couple of questions recently which I would like to try and answer. As there are so many Tomato varieties ( I once read over 25,000, ranging from Black to White and pea size to the size of a small melon) it is difficult to know what to choose. I suppose the best way is to get the variety that suits your own personal requirements. Have you a greenhouse or a “lean-to” or room on a south facing wall – everything makes a difference as to how they will grow, As GH has said, the main types of tomato are Bush (determinate) and Cordon (indeterminate), although there is a semi-determinate type. Bush varieties are of a determinate size, i.e. they stop growing at a certain height ( the size is determined) and are, of course, bushy and compact. These varieties do not need the side shoots to be pinched out and each side shoot will end in flowers. A bush or especially a hanging tomato will do most of it’s growing before setting flower and the fruit will all ripen in a far shorter period of time. The Cordon or indeterminate (the size is not determined) are, I suppose, the sort that we mostly grow in our own gardens. These need staking and the side shoots removing. Having said that there are people that leave 1 – 3 side shoots growing on the plant as well. This will give more tomatoes but also smaller fruits. The main stem will need pinching out after between 4 and 6 trusses (flower clusters). I always decide how many dependant on how good the summer is. Too many green tomatoes left over isn’t the best thing even if there are some marvellous recipes for Green tomatoes and green tomatoes put into a drawer with a banana or apple will help them to ripen. As far as telling the difference between bush and cordon toms at an early stage ….well it is very difficult. Normally when the first truss is flowering it is easy to tell the difference between the varieties. A cordon tomato will carry on growing upwards and has few side shoots, a bush tomato will be showing signs of having flowers on all side shoots at this point. Do also remember that tomatoes can and should be planted deeply as they can root all along the stems. Should you have grown a plant and it has turned out a little “leggy” then plant it a bit deeper – it will be fine. As GH has said tomatoes need regular watering and the tubs, grow-bags, earth should be kept moist at all times. The saying , “Tomatoes like wet feet and a dry head” is very true. I always take the bottom leaves off my tomato plants in order to avoid getting them wet and possibly causing disease. There seem to be so many different ways to water tomatoes. I had a greenhouse for about 10 years and I always used GH’s method of watering and that is to sink a small pot into the soil next to the tomato plant and then water via that. One can also water as normal – in hot summer periods I have literally flooded the GH mornings and evenings as so much water was needed. You can also use the Ring Culture method which involves growing the tomato plants in large 20 – 30cm/8 - 12/14 inch, bottomless pots that are filled with compost. These are, in turn, placed onto a water retaining and free draining base such as gravel. Tomatoes have 2 types of roots, feeding and water seeking roots - the feeding roots are at the top of the root ball hence them being in the ring. The water seeking roots are on the bottom so these can get out the bottom of the pot and seek moisture in the bed below which is always kept quite moist. The tomatoes are fed at the top and watered at the bottom. Always fertilize plants when the compost is moist - not when it is dried out. Any type of watering that doesn't involve the leaves and tomatoes getting wet is an advantage against diseases. To help water retention this method can also be used by planting the tomato in a pot, within another pot, - even with a hanging basket –the tomato can be planted with a small bottomless pot and then planted in the hanging basket - which you keep permanently damp. I personally use good quality bark chippings to cover my tubs to help water retention. As I no longer have a greenhouse, I have for the past 13 years once again grown my tomatoes outside which is entirely feasible, although the yield is possibly not so high depending on the weather that we end up with. A south facing, sheltered and possibly overhanging position near the house is ideal. I have grow my tomatoes, peppers, chillies and cucumbers on the terrace for years – much to the mild annoyance of my OH. This year for the first time I am tomato free on the terrace and have planted everything behind my shed – all south facing and sheltered, while not so good as the terrace. My toms are all in 20 litre tubs and the same rule applies to peppers and chillies as to tomatoes – the larger the tub the larger the plant, the more tomatoes/peppers etc you can harvest. A professional gardener in the village that I live in has half a dozen tomato plants, each in 45 litre tubs, each year and I have seldom seen such wonderful, strong and healthy plants, not to mention the abundance of tomatoes. Sometimes the first flowers fall off as they have not been pollinated....sooo I take the trouble and go around all my toms, peppers, chillies, cucumbers and "tickle" them with a very small paint brush.....sorry!! RF ++++++++++++++++ With due respect to GH and RF, I've added this from our Tomato Trials thread in case it makes a difference... This is for us beginners - what follows is what I did to a tom, and why. It had already got a bit out of control (left behind on the bench after better ones had been planted out) but was too good to dump, so it got 'the treatment'. I should say this is about toms that you grow up a cane (or maybe a string in a GH) - vine or 'indeterminate' toms. Indeterminate = they will go on forever until frost or starvation stops them. You will decide when to stop. Bush toms and their diminuitive cousins, hanging basket toms, can more or less be left to their own devices. If you're not sure what you have, this may just help you identify a mystery tom bought at a sale or given to you, itself often a confusing experience... Before: it has it's full compliment of bushiness, and has had none of its side shoots removed. These are shoots (Hessayon doesn't tell you this) which, if left will become straggly branches ( they may have tempting flower clusters/trusses on them, but they should go) and defeat you if you want to stake it vertically. I probably should say this is a good way to keep things manageable - but just that. As ever, there are no real rights or wrongs. If you like bushy plants, you won't be doing this... 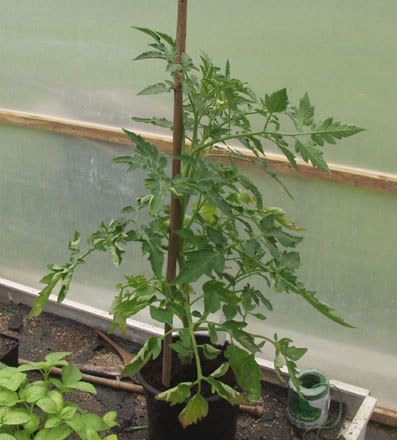 Sometimes, they are so impressive they look like a main stem, but they always start from a joint between the real main stem and a leaf. Identify the main stem low down, and track upwards, looking for candidates. This one is well on the way to branchdom. In a week or two you'd think the main stem had divided, they would look so similar: 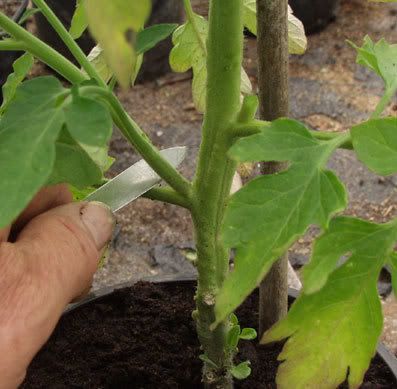 and here it is off - use a sharp knife or really good seccateurs to get a clean cut without crushing the stem. 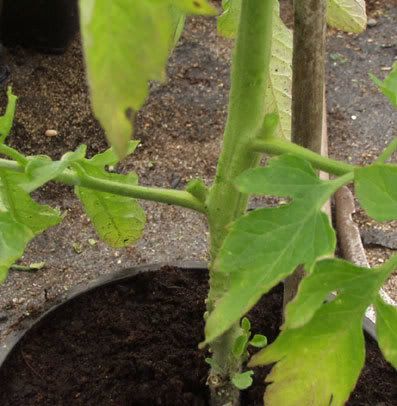 again, an unwanted shoot 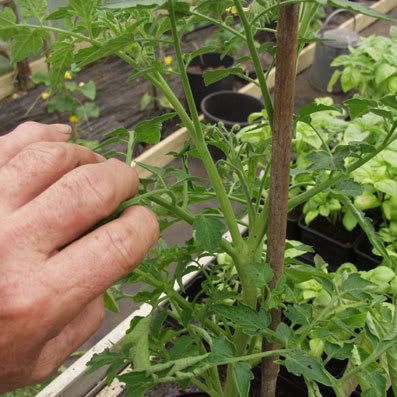 here it is closer, so there's no mistake 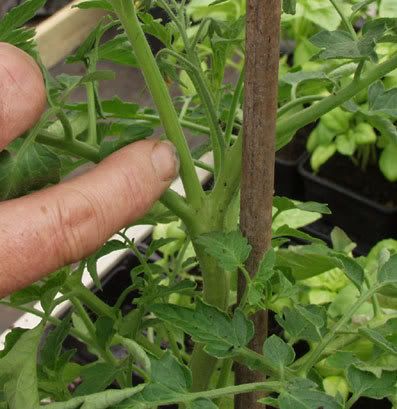 and off it goes - see the flowers on their own stem/branch above? You can not really go wrong and cut flower trusses off by mistake: a) they come out of the stem independently, not from a joint with anything b) if the 'branch' you're cutting has gone so far as to form flowers of its own, the loss of an errant truss will probably be offset by better flower performance from the main stem. 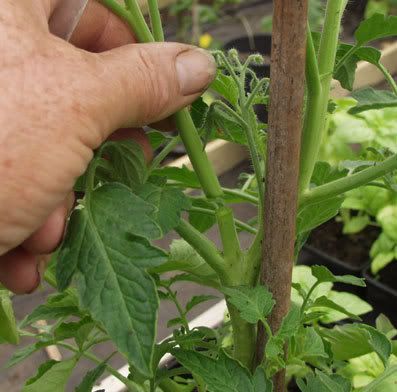 smaller ones, newer, like this one nearer the top can be nipped of with your thumbnail 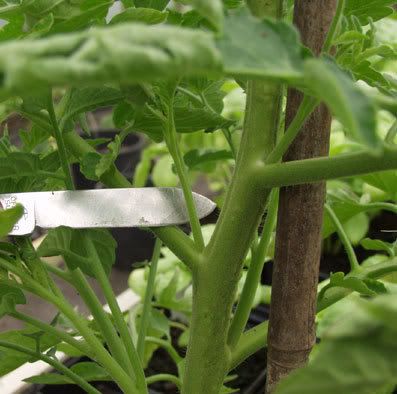 like this 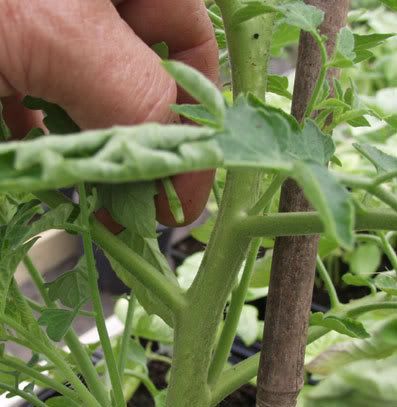 Go up the plant, taking your time to identify these shoots (weird, I know, but I see them as appearing from the armpits between the main stem and the leaf stems) and finally secure the stem to the cane loosely and kindly, with a doubled bit of soft string tied to the cane first, then around the plant. That snaggy stump broke off more cleanly with a determined wiggle. 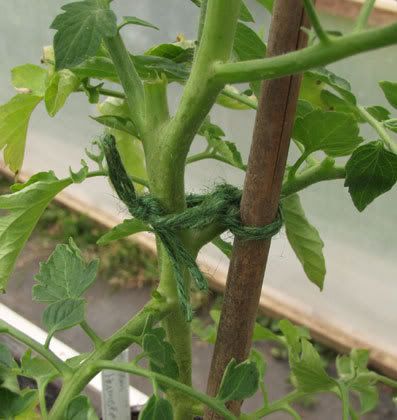 and the finished result, a single stem cleared of side shoots that would soon result in a tangle of tom 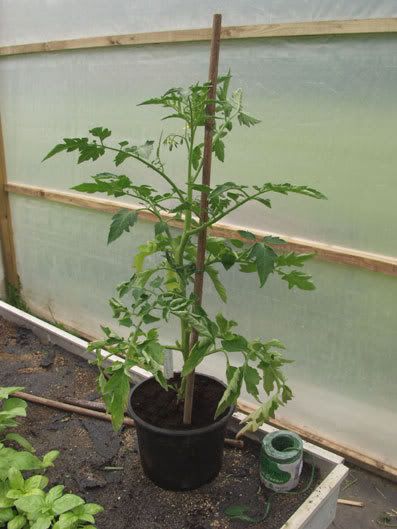 You will keep doing this as the plant grows to its full size and you 'stop' it by nipping out the leading shoot when there are two leaves above what you choose to be the final flower cluster. This decision is determined broadly by a) how tall you find manageble or attractive and b) the need to provoke the plant into ripening your toms while good weather persists, rather than producing lots of toms whose future is uncertain. It might be 3 or 4 or 5 or 6 flower clusters(trusses)... like I say, there's very little in the way of absolutes. It is your plant, after all... OM
|
|
|
|
Post by Cheerypeabrain on Apr 3, 2007 18:36:00 GMT
CPB'S Cucumbers
(apologies...I am no expert, I grow them every year though and this is what I do. Feel free to add to this if you feel so inclined...)
If you grow tomatoes already in your garden or GH then growing cucumbers is just as easy. The taste of freshly picked home grown cucumbers is MUCH better than commercially produced ones bought in the supermarket.
Seeds: I tend to use F1 varieties (also look out for mildew resistant varieties), but there are hundreds to choose from. Last year I grew 'Telegraph' just in the GH and had an excellent crop. This year I'm trying 'Burpless Tasty Green' simply because the name made me snigger ;D(Burpless...geddit?)..I'm going to try growing them outside as well as in the GH as an experiment.
April/May I sow the seeds 1 per 3" pot in good quality seed compost .
Make sure that the seed is 'edge on' as this reduces the risk of them rotting.
Label pot, water from the bottom and leave in a propagator, on a windowsill or in a GH at approx 15-20 C. Germination is generally pretty rapid, 7 - 10 days in my experience....
I've never had a problem with seed, and always have 100% germination, they're a bit like tomatoes in that respect, very reliable.
I only keep 2 plants as there are only 2 of us at home, I share the rest out amongst family and friends. 2 plants can happily fill a standard GH if allowed to.
Usually I can only fit 2 plants in my GH along one side (standard GH). I remove the slats from my staging and plant straight into the border, or plant into 20" plastic pots. As with tomatoes the plants need support (I use bamboo canes) Tie the main stem to the cane (and as it grows keep tying it on to maintain stability...cucumbers are heavy!) This year I shall try growing a plant in my vegetable patch, aiming to have a reasonable sized plant to pop in after the risk of frost has gone. I'll keep you posted
With F1 varieties* remove all the side shoots as the plant grows (the fruit grows from the main stem) Do not remove the flowers as this is where the fruits come from!!!
Some species are female only...but some have both male & female flowers. Distinguish them by the fact that the female flower has an obvious mini cucumber as a stem...the male flowers can be removed (if they are allowed to pollinate the female flowers the resultant cucumbers can be bitter...not that I've ever been particularly vigilant and Ive never noticed the difference!)
Water regularly and feed with tomato fertiliser or similar (as for tomatoes, & don't let the plants dry out!)
Cropping is approx 12-14 weeks after sowing.
* Non-F1 varieties: as above but when pinching out...pinch out side shoots to 2nd leaf until plant is quite tall, then let the side-shoots grow and train them over netting
|
|
|
|
Post by Deleted on Apr 3, 2007 18:54:01 GMT
Ziggywigs' Asparagus:
After leaving the proposed bed for two years, yes you read right, two years and adding manure and weeding. I decided last year was the year to add the asparagus.
I decided to grow Purple Pacific and Gunjilm for contrast. Now i know that most books tell you to plant in Spring but i planted mine in Autumn.
It is important that roots don't dry out, so I soaked the crowns in a bucket of water whilst I dug trenches and made a small mound of soil to lay the asparagus on top. I then backfilled with a mixture of soil and well rotted cattle manure.
I've kept weed free and top dressed with more compost. Whilst weeding t'other day I noticed my spears starting to poke through the ground.
Won't be cutting the asparagus this year so that the crowns can build up and also settle in to the bed.
The main thing is to keep the bed weed free.
I'll keep you updated on how things progress.
|
|
|
|
Post by 4pygmies on Apr 4, 2007 7:00:45 GMT
Herbs:
Every garden should have herbs. They are quite simply an essential! Very decorative, a magnet for helpful insects, a must for cookery and a useful medicine chest growing by your back door. When I started laying out my garden I was an obsessive herb grower and virtually every plant was a herb by someone's definition. Most plants can be described as herbs or are closely linked to a categorised herb.
For starters I would suggest the obvious culinary herbs: Parsley, Sage, Rosemary, Thymes, Basil, Mints, Chives, Bay, Fennel - there are so many available. All will grow well in pots, many are perennial and they are all very easy to cultivate.
For seconds try: Chervil, Lemon Verbena, Salad Burnet, Coriander, Savory, Tarragon, Sorrel.
For those with space and a permanent spot: Comfrey (absolutely essential for veggie growers), Horse radish, Angelica, Elecampane, Lovage.
For companion planting French Marigold, English Marigold, Oregano, Nasturtiums, Summer Savory, Chives.
And I haven't even mentioned Lavenders, Hyssop, Nepeta, Lady's Mantle, Sweet Woodfuff, Lemon Balm, Cotton Lavender or Bergamot. Nor any of the "weed" herbs Mullein, Tansy, Scabious, Teasels etc etc.
I could go on for hours! Herbs are wonderful plants, extremely easy to grow and in cultivation terms can be conveniently divided into 3 main types: Woodland edges/shade, Cornfield and Mediterranean.
Woodland edges/ shade types would cover plants like Sweet Cicely, Comfrey,
Heartsease, Salad Burnet, Foxgloves, Pulmonarias, Primula family, Sweet Woodruff.
Cornfield would be those plants which prefer open sunny habitats like Fennel, Marigold, Hyssop, Thymes, Poppy, Mulleins and so on.
Mediterranean plants are well known and the most commonly used in cooking such as Lavender, Rosemary, Oregano and so forth.
Obviously there are many sub divisions and I've only touched the surface - herbs are a HUGE subject. I'm aware that there are many not mentioned here and I haven't talked about tender herbs or those which prefer moist ground etc etc.
The main thing is grow herbs, spread them around your garden lavishly, stick your nose in amongst them and sniff and watch the wildlife enjoying them as much as you! They are AMAZING!
|
|
|
|
Post by Deleted on Apr 4, 2007 18:25:09 GMT
Chilies
Known variously as capsicums, peppers, arjis, chiles, chillies, piementoes, paprika etc. They are part of the same family as tomatoes and potatoes. I will be focusing on the hot rather than sweet varieties.
What to choose?
There are actually 5 domesticated branches of the chile family and quite a few more in the wild.
Capsicum Annuum's – such as Bell Pepper, Cayenne, Ornamental, Paprika, Pimiento.
Chinense – e.g; the hot Habanero, Scotch Bonnet. But for inexperienced chilli growers give these a miss as they require high humidity, are eratic to germinate and slower growers.
Frutescens such as Tabasco are good for container gardening and produce loads of pods on a plant.
Pubescens - the most difficult to grow.
The best bet if you are a beginner, growing outdoors, want good germination, results fairly quickly are the Annuums. To this end you’ll be pleased to know that all the “trial” chilis fall into this category.
How hot?
This is a major determination for many people. Harvest a young green Hungarian Hot Wax and it will be almost as sweet and big as a sweet pepper, but you’ll get more pods on a plant and you’ll get them quicker. At the other end of the scale is the legendary Naga Morich is the world’s hottest and popular with young men seeking to impress their mates.
A chile’s heat is often measured in Scoville units. To give you a feel of how hot is hot, Maga Morich can register 1 million units, Scotch Bonnets and Harbaneros 250,000. The “trials” chilis will in perfect conditions reach a mere 50,000 units, Hungarian Wax when mature might be 5,000 units, whilst Piementoes top out at no more than 500 units. If harvested early the heat will be lower.
How Big will the plants get?
Depends! The pretty ornamentals may eventually grow less than 10 inches high, whilst others can grow to 8 foot. Many will need staking.
Germination
Using any container, sow on the surface of moist compost and lightly cover with perlite or compost. They can go in a propagator, in an airing cupboard (they need heat not light initially) or on a windowsill (where it might be helpful to stick a plastic freezer bag over the top).
It is also possible to pre-germinate by sprinkling them on damp kitchen roll.
Depending upon the variety that you are growing, your seeds will take anywhere from a few days to several weeks to break the surface. They then need as much light as you can give them, so a south facing window or a warm greenhouse is perfect. Be careful that the very young seedlings don’t get scorched by the Sun.
Transplanting
Chilis produce a set of seed leaves, so wait for the next set of true leaves before transplanting to a larger pot, say 5 inches. Transplant on when their roots show through the holes at the bottom or you will check their growth. The final pot will depend upon the eventual size of the plant. This could be from 6 inches to a builder’s bucket or in the ground. Don't plant in soil previously used for tomatoes or potatoes
When can they go outside?
They are tender, so if you are intending growing them outside wait until the risk of frost has passed.
Feeding
Wait until you have flowers. It is not essential to feed, but a weekly dose of tomato food is beneficial.
Flowering
I have never needed to do this, but if you wish when there are several flowers open on your plant, rub your finger around the middle part to pick up the pollen, and repeat a couple of times for each flower. This will move the pollen to the stamen and start the chemical reaction needed to make the fruit. Most chilis are self pollinators anyway, so you don't need to do anything.
Fruiting
If all is well the flower's petals will drop off as the green middle part of the flower starts to swell slightly. This is the chile pepper beginning to grow. If the small fruits start to fall off then usually it is a sign they are too cold at night. Ideally avoid watering in the evening as they don’t like the shock of cold. However, I leave the watering cans in the greenhouse to warm up during the day.
Harvesting
You can harvest them when they are green, but most turn another colour at maturity, be it orange, red or chocolatey purple. Of the trial chilis the Cheyenne goes orange, whilst the others will turn red. Some say that stressing the plant by allowing it to dry out followed by a feast of water helps the maturity process, but I am unable to comment on this.
I leave most of mine as long as possible. I generally harvest the last weekend in October.
Storing
You are unlikely to use them all at once, so you'll want to store them. You can freeze them (we shove some in the blender to make a pulp, which then goes in ice cube trays. Preserve them in oil. However, by far the simplest way is to put them in a wicker bowl (to allow some air circulation) and shuffle them about a bit every few days. Within a few weeks they’ll have shrivelled and then they will store in a kitchen cupboard for virtually ever.
Overwintering
It is possible, but apart from the small ornamentals not worth it in my experience!
|
|
|
|
Post by isabella on Apr 4, 2007 18:36:53 GMT
GROWING POTATOES This is how we grow our potatoes. There are 3 types of potatoes Early, Second Early and Maincrop. The difference between them is that even though they are planted at roughly the same time they have different growth rates so some are ready earlier than others. An example of some good varieties that we like Early --CHARLOTTE Second Early --MARFONA Maincrop -- DESIREE, PINK FIR APPLE ( for salads) There are lots of varieties to choose from and everyone has their favourites. Seed Potatoes are available from the beginning of February. Always buy virus - free, certified seed potatoes. It is NOT a good idea to use a bag of ordinary Potatoes from the supermarket because of the risk of disease. The seed potatoes should be about the size of a hen's egg. The potatoes should then be set up in either seed trays or egg boxes to CHIT - this is where little shoots grow from the eyes of the potatoes and give them a head start when planted. Put the trays or boxes of potatoes in a light frost-free place. 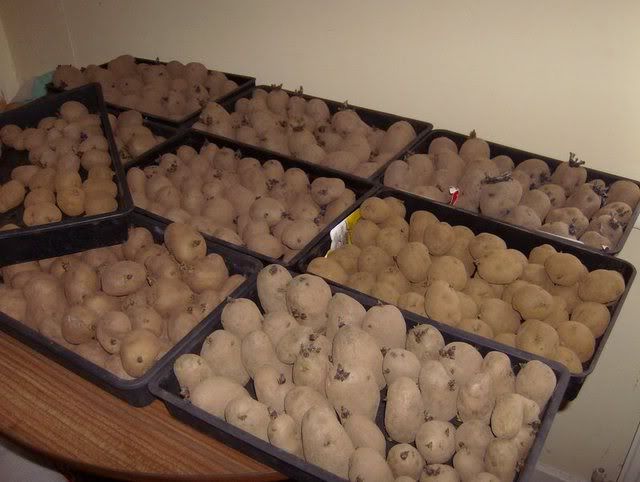 PLANTING Potatoes are planted at the end of March/beginning of April Dig a 6" deep trench and sprinkle in some fertiliser - we use chicken pellets. Spacing the potatoes - 12" for Earlies,14" for maincrop Draw the soil back over the potatoes to cover them. As the Potato shoots come through keep drawing the soil over them - this is called EARTHING - UP- it protects the new shoots from frost and later prevents the crop from going green - green Potatoes are poisonous as are any fruits that appear after the plants have flowered.They look a bit like tomatoes. HARVESTING Early crops will be ready when the plants have finished flowering -scrape a little soil away to see if they are ready. Maincrop are ready when the haulms -greenery- has started to die down. Dig Maincrops up on a warm dry day and leave the Potatoes to dry off for a couple of hours before putting into PAPER or HESSIAN sacks to store them Don't use Bin Liners or plastic as the Potatoes will sweat. Store in a dark frost-free place - we use the shed with a curtain up at the window to keep out the light. Don't store damaged potatoes - they will spoil the rest. Check the crop every few weeks to make sure they are O.K. Some years Potato Blight can be a problem. We don't like using sprays but the Potatoes can be sprayed with Dithane in June as a preventative measure. The most important time to water Potatoes is when the potatoes are about the size of a pea. OH grows KESTREL and WINSTON for showing at our local Flower Show. This year he is having a go at growing them in Polybags. The bags hold 17 litres of Compost and 1 Potato is planted in each bag. They will be put in a trench on the Allotment. If you want to have a go at growing Potatoes there is still time - just leave the chitting out and plant the Potatoes as they are.You should still get a good crop - there is nothing to beat the first taste of Potatoes grown by yourself. I would have just a plateful on their own with some Butter and would be very happy.Yum ;D |
|
|
|
Post by jean on Apr 9, 2007 18:45:02 GMT
Pumpkins/Squash Pumpkins don't have to be the huge types we associate with Halloween, the smaller varieties make really good eating, especially roasted. This is how I grow mine: I tend to sow 2 seeds on their sides, at opposite sides of a 3" pot of good compost in April, allow an extra couple of weeks depending how far North you are (if you plant them flat the germination is very erratic). They take about a week to 10 days to germinate in a GH or on a sunny widowsill. Thin out the weakest seedling and keep moist gradually hardening off till the end of May or when you are sure the frosts are past. The planting site should have been well manured the Autumn before but if this hasn't been possible a good bucket of manure/compost dug into each planting site will do the trick. Pumkins need quite a bit of space - around 1m square each. I make a heap of compost and soil then make a well in the middle. The seedling will benefit from the protection of the well walls until the plant has established its self, it also helps with early watering. As the plant develops, more manure and compost and even grass clippings can be used as a mulch to keep the soil moist and if heaped over the leaf junctions will encourage new roots which in turn will help in feeding the plant. Pinching out the tips when there are 2 or 3 fruit set will encourage larger fruits. Regular feeding and watering is essential. Smaller fruits can be used when picked but the larger varieties and butternut squash benefit from storing in a cool dry shed for a few weeks to mature. Seeds from fruit can be washed, dried and stored in airtight containers for next years crop. I'm growing Jack be Little, Butternut Squash and some surprises (my brother is sending me a selection of his seeds to try out  ) |
|
|
|
Post by jean on Apr 9, 2007 19:14:42 GMT
Sweetcorn Just noticed my sweetcorn (F1 Sweet Nugget) are showing signs of life so has spurred me into adding this post. For most of us Mid to late April is a good time to sow sweetcorn, soaking overnight helps speed up the process. Sow 2 kernels to each 3" pot at around 2cm/1" deep. I use newspaper pots as sweetcorn don't like being disturbed when transplanting. Germination takes around a week on a sunny windowsill or in a GH if you can keep the temp at around 18C. Thin out the weakest seedling and gradually harden off till transplanting at the end of May beginning of June. Same old story - well manured soil is best and a general purpose fertiliser does help. Planting in a block 12" between plants and rows will help the pollination. If planting in exposed areas, it is worth thinking about supporting the plants. Keep watered and wait for the cobs to swell and ripen. When ripe the tassles at the end of the cob turn dark brown. To check if the cob is ripe, gently peel back the outer leaves and press a finger nail into one of the yellow kernels. If there is a milky juice then its ready. Best eaten right away but can be frozen very successfully - also make great BBQ fodder  |
|
|
|
Post by Deleted on Apr 9, 2007 20:50:09 GMT
This thread is fantastic.I have an idea :could the veg. be put in their own sections.....so that it will be easier to access the exact vegetable you need information on.Then if anyone has anything to add,it will be easier.
Thanks.
Robin.
|
|
|
|
Post by Dutchy on Oct 21, 2007 17:23:54 GMT
Ping ping and double ping. I was going through the veg threads for more information on growing them and found this thread.  to you all. Are there any winter sown beans? I read about some you had to plant october november and harvest in june. How do they survive winter? Or are they sown inside? |
|
|
|
Post by Dutchy on Jan 8, 2008 8:57:11 GMT
What can be sown now ?
Itching to start and have got some broad beans in pots.
None showing yet but I plan to start on some peas as well.
Any tips or hints?
|
|
|
|
Post by Rosefriend on Jan 8, 2008 10:05:08 GMT
I don't know about Broad beans but I am going to start my chillies this coming week. As some have said they need warmth, so it is the kitchen window sill for them. I hope that I have better luck than last year ....at least if I start now the plants should be stronger and be able to cope better.
RF
|
|
|
|
Post by jean on Jan 8, 2008 22:22:06 GMT
RF if you are doing chillis on the window will, it might be worth tucking them up in poly bags as they do need a constant heat to germinate  |
|
|
|
Post by Rosefriend on Jan 9, 2008 9:39:52 GMT
Thanks jlo - I must admit that the last time I did that I didn't take the bag off enough and once the seeds had germinate they rotted I am afraid.
I will definitely try to do better this time.
RF
|
|
|
|
Post by Dutchy on Jan 10, 2008 8:58:43 GMT
RF I sowed my Chillies in the second week of March indoors. I had them indoors over a warm central heating. I did pot up there too to transfer them later when April was warm enough to my cold frame. I hardened them off in May and when the nights stayed above 15 *C I planted them in my big container and put them in a sheltered sunny spot.
I did ad fertilizer to the container before I planted them. I think they did pretty well as I was only two Chilli behind last years largest crop and am still using the dried ones.
|
|
|
|
Post by flowersfriend on Feb 21, 2008 18:52:41 GMT
Just for interest..... we did exactly the same thing Duchy. We took the seed from the previous years dried chillies. Did you? OH is still a bit nervous about saving seed. He says he does'nt want the seeds to fail and has more faith in shop bought seeds..... I disagree anyway we had thousands of chillies..  |
|
|
|
Post by Dutchy on Feb 22, 2008 18:49:53 GMT
You can grow them perfectly well from saved seeds I think. Only F1 hybrids will not come true. Do you know I even take seeds out of supermarket Toms and Chilies and Paprika. The latter two I did not sow but this year I will sow from my own produce of last year. I intend to get two plants going as it is enough for me. I will not be buying seeds when I can get them for free  Somehow people I see potter about, and do as they please with a very relaxed attitude to it all, seem to have the best plants. You could start your own trial. Bought versus saved. See which does best. |
|
|
|
Post by Ladygardener on Feb 25, 2008 8:43:01 GMT
very interesting thread folks thanks ;D
|
|
|
|
Post by Tig on Jun 3, 2008 10:55:18 GMT
It has been suggested that a copy of this is posted here for future reference, I hope those with additional information can enhance the list  Extracted from my various books on veg growing, these are the average weeks from sowing (or planting out spuds, etc,) to start of harvest, this is a rough guide as newer varieties may crop quicker. I have also included information on approximate yield per metre row (at suggested spacings of course). Vegetable - Harvest after - Appx Yield per metreArtichoke, Globe - 32-36 wks Artichoke, Jerusalem - 40-50 wks Asparagus - 12 months* Harvest lightly yrs 2 & 3 Asparagus Pea - 8-10 wks Aubergine - 20 wks Bean, Broad - 14-26 wks - 1.5lb (.75kg) Bean, French - 8-12 wks - 3lb (1.5kg) Bean, Runner - 12-14 wks - 13lb (6kg) Beetroot - 12-16 wks - 4.5lb (2kg) Broccoli - 12-16 wks Broccoli, Sprouting - 40 wks - 2lb (1kg) Brussel Sprouts - 28-36 wks - 4.5lb (2kg) Cabbage, Chinese & Asian Greens - 10-14 wks - 3lb (1.5kg) Cabbage, Spring - 30-36 wks - 2lb (1kg) Cabbage, Summer & Autumn - 20-26 wks - 7lb (3.2k) Carrot, Early - 12-16 wks Carrot - 16-20 wks - 5lb (2.5kg) Cauliflower, Spring - 40-46 wks Cauliflower, Summer - 20-26 wks - 4.5lb (2kg) Celeriac - 30-35 wks Celery - 18-30 wks - 3lb (1.5kg) Corn Salad - 16 wks Courgette & Marrow - 10-14 wks - 6.5lb (3kg) Cucumber - 12-14 wks Fennel, Florence - 10-14 wks Garlic - 24-30 wks Herbs - 12-18 wks Horseradish - 28-30 wks Kale - 30-35 wks Kohlrabi - 8-12 wks Leek -30-45 wks - 7lb (3.2k) Lettuce - 6-14 wks - 2lb (1kg) Mesclun (mixed salad leaves) - 3-8 wks Okra - 16 wks Onion (bulb) - 22-46 wks - 5lb (2.5kg) Onion (salad, spring) - 10 wks Parsnip - 34 wks - 7lb (3.2k) Pea - 12-32 wks - 4.5lb (2kg) Pepper - 18 wks Potato (early) - 13-16 wks Potato - 20-22 wks - 9lb (4 kg) Potato, Sweet - 18-24 wks Pumpkin - 10-19 wks Radish - 3-12 wks Rhubarb -15 months Shallot - 18-26 wks - 3lb (1.5kg) Spinach - 8-14 wks - 2lb (1kg) Squash - 10-19 wks - 9lb (4 kg) Swede - 20-24 wks - 4.5lb (2kg) Sweetcorn -14 wks - 2lb (1kg) Swiss Chard - 12 wks Tomatillo - 18 wks Tomato (indoor) - 16 wks - 6lb (per plant) Tomato (outdoor) - 16-20 wks - 4lb (per plant) Turnip - 6-12 wks - 4.5lb (2kg) |
|
|
|
Post by Tig on Aug 26, 2008 19:41:43 GMT
When to sow veggies - found this on my travels, it may be of some use if you are looking for something to sow at a specific time of year, or you are given some veggie seeds with no instructions  www.tuckers-seeds.co.uk/pdf/SOWINGCHART.pdf www.tuckers-seeds.co.uk/pdf/SOWINGCHART.pdfI have been putting something similar together from the information on my own sowings, which I will post when it makes sense  |
|
|
|
Post by Rosefriend on Aug 27, 2008 5:21:54 GMT
Great idea Tig - I have already printed it out. It certainly give you an idea, at a glance, when things need to be sown.
Thanks a lot.
RF
|
|
|
|
Post by Tig on Aug 27, 2008 19:19:37 GMT
Hope this is of some use - Vegetable Growing Calendar UK (always check your seed packets for detailed instructions as some varieties may have specific requirements)
JanuaryIndoorAubergine, Leek, Mustard & Cress (can be sown all year round), Onion (Seed) FebruaryIndoorAubergine, Brussels Sprouts, Cabbage (Summer), Celery, Cucumber, Leek, Lettuce, Melon, Onion (Seed), Peppers (Sweet & Chilli), Sweet Basil OutdoorBroad Beans, Jerusalem Artichoke tubers, Kohl Rabi, Parsnips MarchIndoorAubergine, Broccoli, Lettuce, Cabbage, Cauliflower, Celeriac, Celery, Chives, Cucumber, Dwarf French Beans, Leek, Marrow, Melon, Peppers (Sweet & Chilli), Pumpkin, Squash, Sweet Basil, Sweet Corn, Tomato OutdoorBroad Beans, Broccoli (Early purple sprouting), Brussels Sprouts, Calabrese, Carrots, Cauliflower (Summer), Coriander, Fennel (Florence), Kale, Kohl Rabi, Leek, Mesclun, Mizuna, Onion / Shallot sets, Parsley, Peas, Radish, Rocket, Rhubarb Crowns, Spinach (Summer), Spring Onion, Turnip (Early) AprilIndoorAubergine, Cabbage, Celeriac, Cauliflower, Courgette, Cucumber, Dwarf French Beans, Globe Artichoke, Marrow, Melon, Peppers (Sweet & Chilli), Pumpkin, Squash, Sweet Basil, Sweet Corn, Tomato OutdoorAsparagus, Beetroot, Broad Beans, Broccoli & Purple Sprouting, Brussels Sprouts, Cauliflower (Summer), Carrots, Chinese Mustard, Chives, Coriander, Cucumber (outdoor varieties), Dill, Dwarf French Beans, Endive, Fennel (Florence), Globe Artichoke, Leek, Lettuce, Kale, Kohl Rabi, Mesclun, Mizuna, Oregano, Parsley, Parsnip, Peas, Radish, Rocket, Runner Beans, Salsify, Scorzonara, Spinach (Summer & Perpetual), Spring Onion, Swede, Swiss Chard, Turnip (Early) MayIndoorPeppers (Sweet & Chilli) OutdoorBeetroot, Broad Beans, Broccoli & Purple Sprouting, Brussel Sprouts, Cabbage, Cauliflower (Summer/Winter), Carrots, Chinese Mustard, Chives, Coriander, Courgette, Cucumber (outdoor varieties), Dill, Dwarf French Beans, Endive, Fennel (Florence), Globe Artichoke, Leek, Lettuce, Kale, Kohl Rabi, Marrow, Mesclun, Mizuna, Oregano, Pak Choi, Parsley, Parsnip, Peas, Radish, Rocket, Runner Beans, Spinach (Summer & Perpetual), Spring Onion, Sweet Basil, Swede, Swiss Chard, Thyme, Turnip (Early) JuneOutdoorBeetroot, Broccoli (Early purple sprouting), Cabbage, Carrots, Cauliflower, Chinese Mustard, Coriander, Courgette, Dill, Dwarf French Bean, Endive, Fennel (Florence), Lettuce, Kohl Rabi, Marrow, Mesclun, Mizuna, Pak Choi, Parsley, Radish, Rocket, Runner Bean, Spinach (Summer & Perpetual), Spring Onion, Swede, Sweet Basil, Peas, Swiss Chard, Thyme, Turnip (Early) JulyIndoorCabbage (Spring) OutdoorCabbage, Carrots (Winter), Cauliflower (Spring), Chinese Mustard, Dwarf French Bean, Endive, Kohl Rabi, Lettuce, Mesclun, Mizuna, Pak Choi, Parsley, Peas, Radish, Rocket, Spinach, Spring Onion, Swede, Swiss Chard, Turnip AugustIndoorCabbage (Spring) OutdoorAmerican Cress, Cabbage (Red) - under cloche, Corn Salad / Lambs Lettuce, Endive, Mesclun, Mizuna, Onion Seed (to overwinter), Pak Choi, Spinach (Winter/Perpetual), Spring Onion, Turnip SeptemberIndoorCauliflower (transplant October under protection) OutdoorAmerican Cress, Spring Cabbage, Chinese Cabbage, Russian Kale, Turnips for tops, Purslane Winter, Radish oriental and winter varieties, Cabbage (Red) - under cloche, Cauliflower (Spring) - under cloche, Corn Salad / Lambs Lettuce, Endive, Garlic cloves (mid Sept), Japanese Onion sets, Spinach (Winter/Perpetual) OctoberOutdoorAmerican Cress, Broad Beans, Garlic cloves, Japanese Onion sets, Rhubarb crowns, Spinach (Perpetual) NovemberOutdoor* Early November - Broad Beans, Garlic cloves, Rhubarb crowns DecemberIndoorOnion seed (late December) Information has been collated from various sources, books, on-line and seed packets! If you have anything to add from your own resources or spot any deliberate mistakes please pm me and I will amend as required  x Tig |
|